Reese weight distribution hitch setup is a great way to improve the stability of your tow vehicle and trailer.
With this type of hitch, the weight of your trailer is evenly distributed across the hitch head and bars.
In this article, we’ll show you how to properly set up a Reese weight distribution hitch.
Reese Weight Distribution Hitch Setup
To Set Up a Reese Weight Distribution Hitch, you need to follow the below steps:
Step 1: Take Vehicle Measurements
To ensure that your Reese weight distribution hitch is properly installed, you need to take accurate measurements of your vehicle.
You will need to know the tongue weight (TW), which is the downward force exerted by the trailer’s coupler on the ball mount of the hitch.
The TW should be between 10-15% of the total trailer weight.
You will also need to know the gross trailer weight (GTW), which is the total weight of the trailer and its contents.
Step 2: Install the Weight Distribution Shank
Remove the old shank and install the new one following the manufacturer’s instructions.
Make sure that the hitch is properly secured to the vehicle before attaching the trailer.
Now that you have a new weight distribution shank installed, you’re ready to install it.
Before you measure, ensure that your trailer is level by using a ruler or another measuring device.
Once it is level, take the measurement from the top of the coupler to see how far it extends toward the ground.
This measurement is crucial for guaranteeing your hitch ball is installed in the precise spot.
For superior results, use a level on the side of your trailer.
Step 3: Install The Hitch Ball
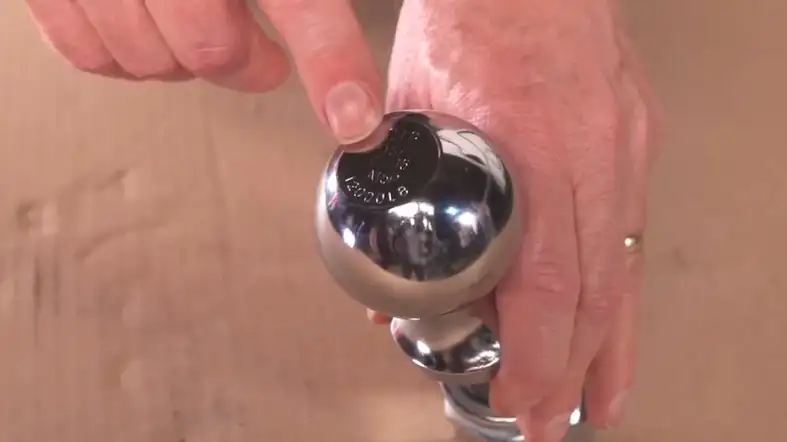
Next, you will need to install the hitch ball.
This is what your trailer will hook onto.
The size of your hitch ball should be based on the size of your trailer coupler.
The ball mount will have a similar weight rating.
You want to make sure that the hitch ball is rated for at least as much weight as the trailer tongue.
Before you start installing the hitch ball, it is a good idea to clean off the threads.
This will help to prevent rust and make it easier to get the ball tight.
Install the hitch ball, simply thread it onto the ball mount until it is hand tight.
Then, use a wrench to tighten it an additional half turn.
You do not want to over-tighten the hitch ball, as this can damage the threads.
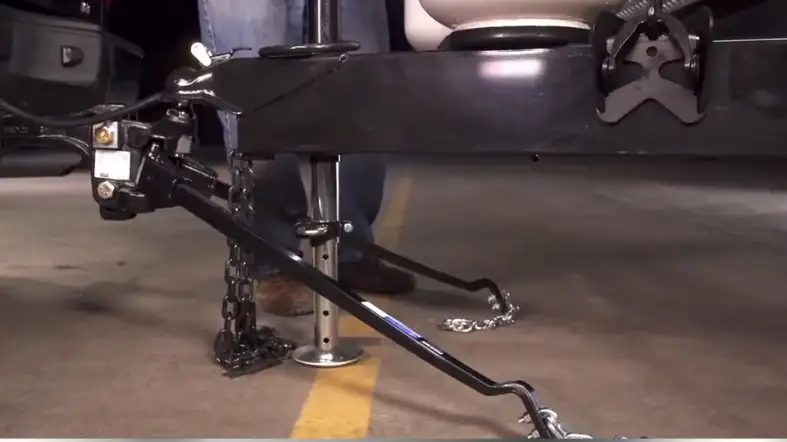
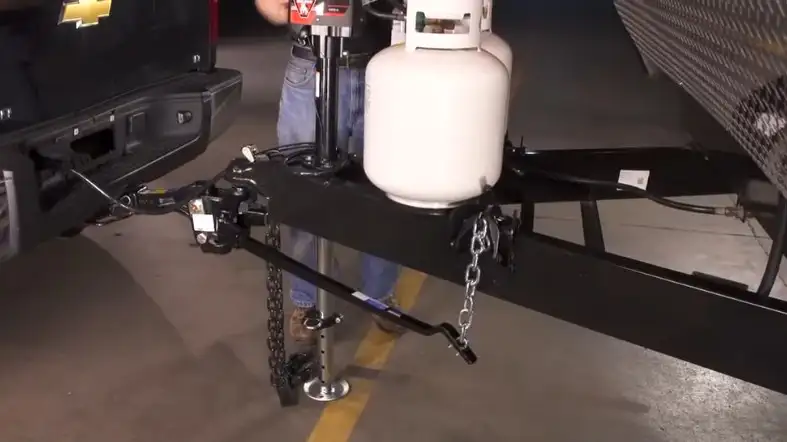
Step 4: Attach the Reese Weight Distribution Hitch
With the hitch ball in place, you are now ready to attach your trailer.
Begin by backing your vehicle up to the trailer so that the coupler is lined up with the hitch ball.
Then, lower the coupler onto the hitch ball and latch it in place.
Once the coupler is secured, you can tighten the latch if necessary.
If your trailer has a surge brake, there will be a cable that runs from the trailer to the hitch.
This needs to be connected before you can continue.
Using a drill and the appropriate size bit, make your hole in the trailer frame.
Then, insert the bolt through the bracket and thread it into the hole.
Tighten the bolt until it is snug, but do not overtighten as this could strip the threads.
Finally, attach the chain to the bracket and clip it onto the trailer tongue.
Step 5: Adjust the Sway Bars
If your trailer is equipped with sway bars, now is the time to adjust them.
The goal is to have the bars snug against the trailer frame, but not so tight that they are binding.
But if the sway bars are too loose, they will not be effective.
If you have a weight distribution hitch, there will be two arms that come off the hitch head.
These need to be adjusted so that they are level with the ground.
For this, first, loosen the bolts that hold the arms in place.
Then, raise or lower the arms until they are level.
When they are in the correct position, re-tighten the bolts.
Step 6: Check All the Lights
Before you hit the road, it is important to check all of the lights on both your vehicle and trailer.
This includes the brake lights, turn signals, and running lights.
If you want to be extra safe, you can also have someone else stand behind your vehicle to confirm that the lights are working.
Once you have verified that all of the lights are working, you are ready to hit the road!
Just remember to take things slowly at first so that you can get used to towing a trailer.
As you can see, installing a weight distribution hitch is not too difficult.
With a little patience and the right tools, you can do it yourself in no time.
Can You Back Up With Reese Weight Distribution Hitch?
Yes, you can back up with a Reese weight distribution hitch.
Just be sure to go slowly and use caution, as it is easy to misjudge your trailer’s length when backing up.
It is also a good idea to have someone else guide you while you are backing up, just in case.
In addition, you need to be extra careful if your trailer has a load on it, as this can make it more difficult to control.
Why You Should Use a Reese Weight Distribution Hitch?
There are several reasons why you should use a Reese weight distribution hitch.
First, it helps to distribute the weight of your trailer more evenly.
This can help to improve your vehicle’s handling and braking.
In addition, a Reese weight distribution hitch can help to keep your trailer level.
This is especially important if you are carrying a heavy load, as it can help to prevent your trailer from bottoming out.
Finally, a weight distribution hitch can also help to reduce wear and tear on your vehicle’s suspension.
This is because the weight is distributed more evenly, which takes some of the strain off of your vehicle’s components.
If you are planning on towing a trailer, a Reese weight distribution hitch is a wise investment.
It can help to improve your safety on the road and extend the life of your vehicle.
Should Reese Weight Distribution Bars Be Parallel?
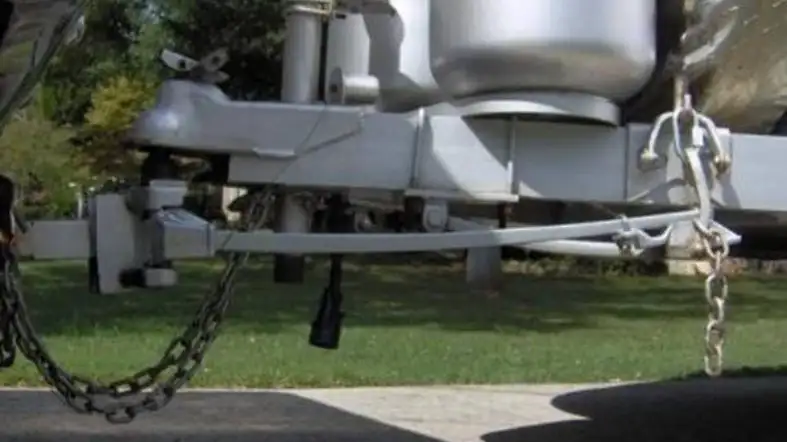
In order for your weight distribution system to function properly, the trunnion bars must be parallel to the ground.
If they are not, it could cause your trailer to sway back and forth.
You may need to adjust the height of your hitch to get the bars parallel to the ground.
If you have a Reese weight distribution system and you’re not sure if the trunnion bars are parallel to the ground, here’s how you can check.
First, measure the distance from the ground to the top of the hitch.
Next, measure the distance from the ground to the center of the trunnion bars.
When these two measurements are different, your trunnion bars are not parallel to the ground.
To adjust the height of your Reese weight distribution hitch, first, loosen the nuts on the adjustment bolts.
Next, raise or lower the hitch until the trunnion bars are parallel to the ground.
Finally, tighten the nuts on the adjustment bolts.
FAQs on Reese Weight Distribution Hitch Setup
Can You Over Tension A Reese Weight Distribution Hitch?
If the tension on your spring bar is set too high, you will start to experience problems with your ride.
The trailer will start to bounce and may even start to fishtail.
You may also notice that the chains are starting to sag.
Should I Remove A Reese Weight Distribution Bars Before Backing Up?
No, you don’t need to remove the Reese weight distribution bars before backing up.
In fact, it’s not recommended that you do so.
Can I Over Tighten A Reese Weight Distribution Hitch?
No. If the turnbuckle is too tight, then there won’t be any movement in the front and the trailer will be stiff.
Conclusion
Now that you know how to set up your Reese weight distribution hitch, you can hit the road with confidence.
Also, be sure to check the tension on the spring bars periodically to ensure that they are in good working condition.
So when you’re ready to tow, be sure to check your Reese weight distribution hitch first.